How to Make a Game on Scratch Step-by-Step for Beginners
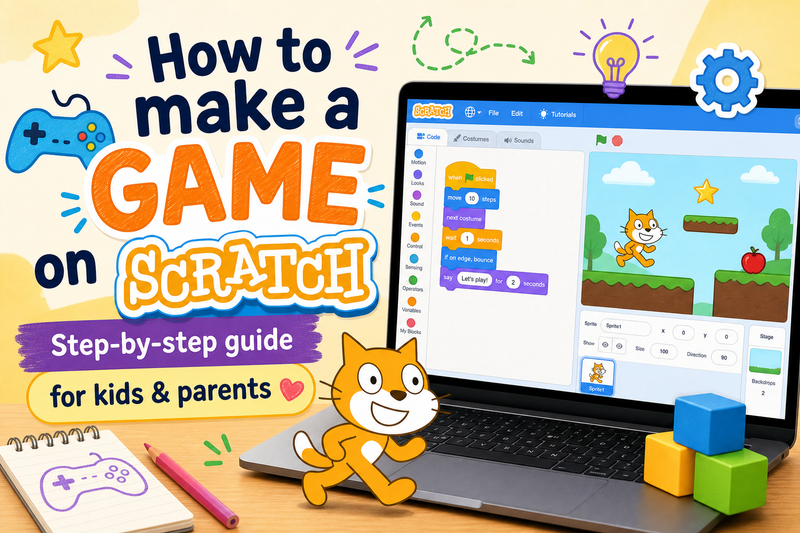
Scratch programming for kids has quietly become one of the most powerful gateways into the world of technology, and it starts with something every child loves: making games. With over 130 million registered users worldwide, Scratch is the world's most popular platform for young coders, and for very good reason.
This guide walks beginners through exactly how to make a game on Scratch, step by step, from choosing a backdrop to debugging your final build. Whether your child is picking up coding for the first time or you're looking to supplement their learning with online coding classes for kids, this is the place to start.
What Is Scratch and Why Is Scratch Programming for Kids So Popular?
Scratch is a free, browser-based coding platform developed by MIT Media Lab. Instead of typing complex code, kids drag and drop colorful blocks to build programs, making it genuinely accessible for children as young as 8.
What makes Scratch programming for kids especially effective is how it mirrors real coding logic. Kids learn sequencing, loops, conditionals, and variables, core computer science concepts, without ever feeling like they're studying. They're just building something fun.
From a parent's perspective, Scratch connects directly to STEM skills that matter. Problem-solving, logical reasoning, creative thinking, all of these develop naturally when a child tries to make a game on Scratch work exactly the way they imagined it.
Types of Coding Games for Kids You Can Make on Scratch
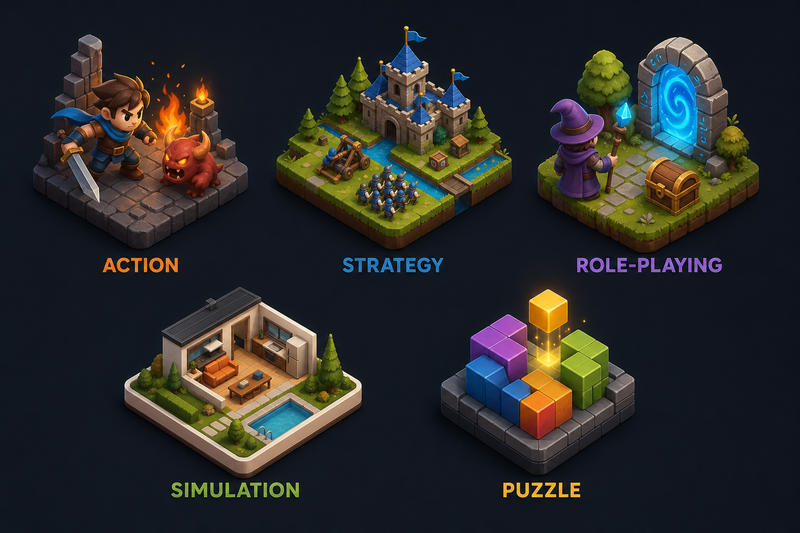
One of the best things about Scratch is its versatility. Coding games for kids come in all shapes and sizes, and Scratch supports them all. Here are the most popular types beginners make:
Want to build a platform game first? See our guide on how to make a jumping game on Scratch.
All of these are realistic goals for beginners. Start simple — a clicker or chase game is the ideal first project. For ready-made inspiration, browse the best Scratch games for beginners to play and remake.
Scratch Interface Basics
Before writing a single block of code, it helps to know what you're looking at. Here's a quick tour of the Scratch workspace:
Stage, The large white area on the right where your game actually runs and is displayed.
Block Palette, The panel on the left where all your code blocks live, sorted by category.
Coding Area, The middle workspace where you drag blocks and assemble your scripts.
Sprite Panel, Located below the stage; shows all the characters and objects in your game.
Backdrop Section, Also below the stage; lets you set or change the game's background.
Green Flag, The "play" button at the top of the stage. Click it to run your game.
Sound Tab, Found in the editor tabs above the coding area; used to record or add audio.
Spend a few minutes clicking around before building anything. Familiarity with the interface makes Scratch programming for kids far less overwhelming.
Scratch Code Blocks Explained: The Complete Block Types Table
Every action in Scratch is controlled by a color-coded block. Understanding what each category does is the foundation of knowing how to make a game on Scratch. Here's the definitive breakdown:
As you work through coding games for kids, you'll naturally start combining these blocks. A chase game, for example, uses Motion to move the character, Sensing to detect collisions, and Control to loop the action forever.
How to Make a Game on Scratch: Step-by-Step Tutorial
This is the core of the guide. Follow these steps in order and you'll have a working game by the end.
Step 1: Finalize the Game Plan Decide what kind of game you're building before opening Scratch. Write down: Who is the player character? What is the goal? How does the player win or lose? A clear plan prevents confusion later. Scratch programming for kids works best when there's a target to build toward.
Step 2: Choose Your Backdrop Click the Backdrop section in the bottom-right corner. You can pick from Scratch's built-in library, upload an image, or draw your own. The backdrop sets the tone, a space background for a shooting game, a forest for an adventure.
Step 3: Add or Create Your Sprites Click the Sprite icon (the blue cat face) to add characters from the library, or draw your own using the built-in Paint Editor. Every game needs at least one sprite. For a chase game, add two, a player and an enemy.
Step 4: Start Coding with Motion and Events Blocks
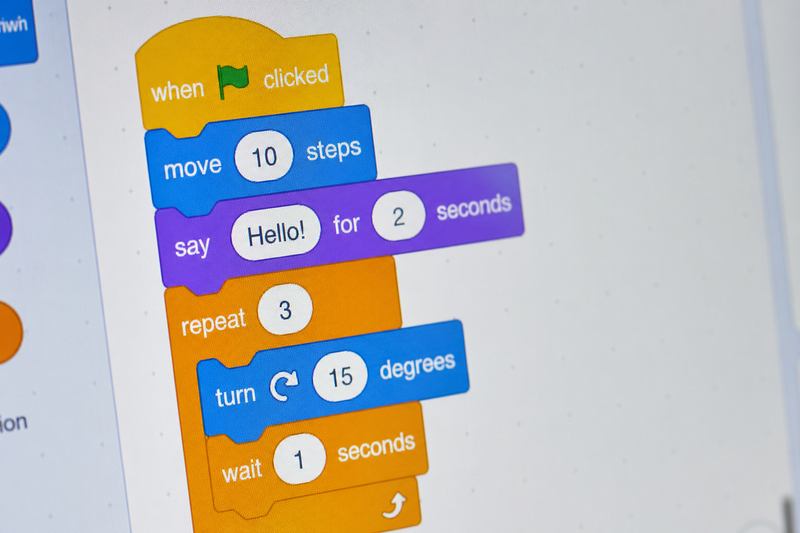
Click your player sprite, then go to the Coding Area. Drag a When Green Flag Clicked block (Events) to the canvas. Attach a Move 10 Steps block (Motion) beneath it. Now when you press the green flag, your sprite moves. Add If Key Pressed blocks to link arrow keys to movement, this is how player control is born.
Step 5: Add Looks and Sound to Bring Your Game to Life A game without feedback feels flat. Add a Say [Score!] for 2 Seconds block when the player succeeds. Use the Sound tab to import a background track or a quick sound effect for collisions. These small additions dramatically improve how coding games for kids feel to play.
Step 6: Create Variables for Scores and Timers Go to the Variables section and click Make a Variable. Name it "Score." Add a Change Score by 1 block inside your collision logic so the score increases every time the player achieves something. Add a second variable called "Timer" and use a loop to count it down. Variables transform a basic demo into a real game.
Step 7: Implement Game Controls and Logic Using Control Blocks This is where your game gets structure. Use a Forever block to keep the game running continuously. Use If/Then blocks to check conditions: "If the player touches the enemy, end the game." Use Repeat Until to run a countdown. Control blocks are the brain of every game built with Scratch programming for kids.
Step 8: Test, Debug, and Improve Your Game Click the green flag and play your game. Does the sprite move correctly? Does the score increase? Does the game end when it should? If something breaks, don't panic, debugging is a real coding skill. Check each script block by block. Start fresh with just one sprite if needed. Every professional developer debugs their code. So do kids learning how to make a game on Scratch.
Common Beginner Mistakes and How to Avoid Them
Even the most enthusiastic beginners run into the same walls. Knowing what to watch for saves hours of frustration.
Forgetting the Green Flag block. If your code doesn't start with When Green Flag Clicked, your scripts won't run when you press play. Every script needs a trigger, this is the most common oversight in Scratch programming for kids.
Overlapping sprites. If two sprites are placed on top of each other at the start, your collision detection will trigger instantly. Always position sprites at opposite ends of the stage when the game begins.
Missing variable resets. When a player restarts the game, your Score and Timer variables need to reset to zero. Add a Set Score to 0 block right after your Green Flag trigger. Skipping this is a classic mistake when learning how to make a game on Scratch.
Not using loops. Without a Forever loop, your code runs once and stops. Movement, sensing, and scoring all need to run continuously. Wrap your core game logic in a Forever block to keep things running.
Debugging tip: Right-click any block and select "Add Comment" to leave yourself notes. If something isn't working, temporarily remove blocks one at a time to isolate the problem. This methodical approach is exactly what professional coders do.
Why Scratch Programming for Kids Matters: Educational and Future Benefits
Learning how to make a game on Scratch isn't just a fun afternoon project, it builds skills that last. According to Research and Markets, the online coding for kids market is projected to reach $6.51 billion in 2026, growing at a 20.7% annual rate. Demand for technically literate young people has never been higher.
Scratch programming for kids develops logical thinking directly. When a child figures out why their sprite isn't moving, and fixes it, they're practicing the same analytical reasoning used by software engineers. Creative problem-solving, persistence through bugs, and the satisfaction of building something from nothing are all genuine outcomes of making coding games for kids.
Long-term, these skills connect to careers in software development, data science, game design, AI, and engineering. But even for children who don't pursue tech professionally, computational thinking is increasingly valuable in every modern field.
The most effective path combines self-guided Scratch exploration with structured instruction. Online coding classes for kids give learners a curriculum that progresses logically, while live 1:1 coding classes provide the personalized feedback that makes the biggest difference, especially when a child gets stuck on a concept and needs a mentor to help them break through.
Conclusion
Scratch programming for kids is one of the most accessible, effective, and genuinely enjoyable ways to introduce children to the world of coding. Building a first game teaches far more than technology, it builds confidence, creative thinking, and the resilience to debug and keep going.
The best approach is to start building today and supplement that exploration with structured learning. Explore Scratch courses for kids through CodeYoung to follow a proven curriculum, or enroll in live 1:1 coding classes for personalized mentorship that helps young coders level up faster than they ever could alone. Once the basics click, a specific challenge like how to make Flappy Bird in Scratch is the perfect next build. The green flag is waiting, press it.
Frequently Asked Questions
How do you make a game on Scratch for kids?
To make a game on Scratch, start by choosing a game type (clicker, chase, or platform), then set your backdrop, add sprites, and build scripts using Events, Motion, and Control blocks. Assign variables for score and time, add sound effects, and test your game using the Green Flag. Scratch programming for kids is designed to be beginner-friendly, most children can build their first working game within a few hours of starting. The step-by-step guide above covers every part of this process in detail.
What is the easiest game to make on Scratch for beginners?
A clicker game or a simple chase game is the easiest starting point when learning how to make a game on Scratch. Clicker games require only a few blocks, a sprite, an Events trigger, and a variable to track clicks. Chase games add basic movement and collision sensing. Both types of coding games for kids use fundamental Scratch concepts and can be completed in a single session.
A maze game on Scratch is another great beginner project, it teaches directional movement and collision sensing with very few sprites.
How can kids learn Scratch programming for kids faster?
The fastest way to improve at Scratch programming for kids is to combine self-directed building with guided instruction. Watch tutorials, study other people's Scratch projects by looking at their code ("See Inside"), and then build your own version from scratch (no pun intended). Enrolling in live 1:1 coding classes accelerates progress significantly, a dedicated instructor can identify gaps in understanding and correct them in real time, which self-study alone cannot replicate.
Are online coding classes for kids effective?
Yes. Online coding classes for kids are highly effective when they're structured, interactive, and taught by qualified instructors. Studies consistently show that active, project-based learning, where kids build real things like coding games for kids, produces stronger retention than passive video watching. The best platforms pair curriculum-based learning with live instruction, giving children both the structure and the support they need to progress steadily in Scratch programming for kids and beyond.
What are live 1:1 coding classes and how do they help?
Live 1:1 coding classes are real-time, one-on-one lessons between a student and a qualified coding instructor, delivered online. Unlike group classes or pre-recorded videos, live 1:1 coding classes allow the teacher to focus entirely on one child's specific questions, learning pace, and project goals. For Scratch programming for kids, this means a mentor can watch a child attempt to make a game on Scratch in real time, catch mistakes immediately, and guide them to solutions, dramatically shortening the learning curve compared to independent study.
Can coding games for kids lead to a career in tech?
Absolutely. Many professional software engineers, game developers, and data scientists trace their interest in technology back to early experiences building coding games for kids, including on platforms like Scratch. Scratch programming for kids teaches core computational thinking skills (logic, sequencing, debugging, abstraction) that directly underpin professional coding languages like Python, JavaScript, and C++. While Scratch itself is a starting point, children who build on this foundation through structured online coding classes for kids are well-positioned to pursue rewarding careers in technology.
Comments
Your comment has been submitted