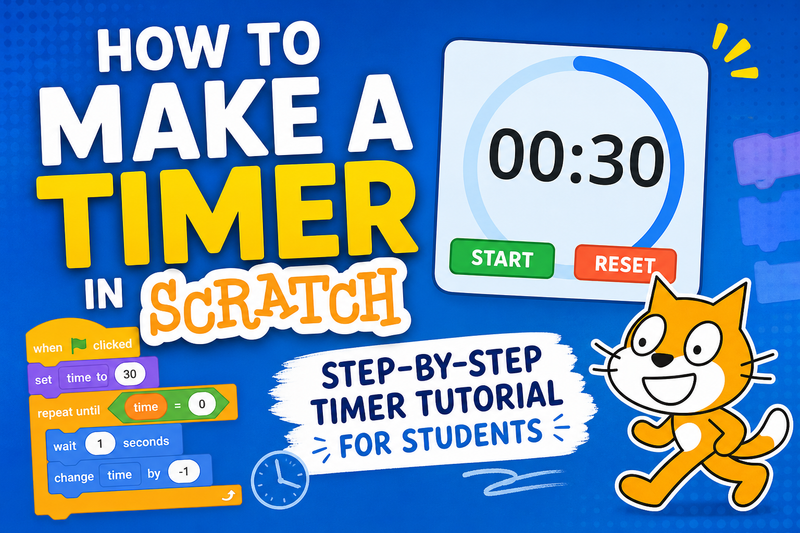
How to Make a Timer in Scratch - Step-by-Step Timer Tutorial for Students
In many Scratch games, we might want to track time. You can measure how much time has passed or set a limit. This way, the game ends when the timer hits zero. A timer in Scratch is simply a way to track elapsed time or current value in your project, especially when the green flag clicked. You can use the built‑in timer variable (from the Scratch library) or create a Scratchtimer with a new variable and variable name of your choice.
This step-by-step tutorial for a timer in Scratch explains how to make a timer in Scratch efficiently. We’ll set the timer's initial value, show it on the screen, and run an if then block inside a loop to update the timer value every one second.
What is Scratch and What is a Timer in Scratch?
Scratch is a free, block‑based visual programming language that students use to build animations, scratch games and interactive projects. In the scratch environment, you can create a new project, snap together code blocks and learn Scratch by doing. In Scratch, a timer lets you track elapsed time or time remaining, making it easy to add clocks or countdown timers to various projects. This is especially useful for Scratch for students learning basic programming logic through fun projects.
We set timer by creating a timer variable or using the built‑in timer variable that starts when clicked on green flag. First, use reset timer block or set timer to an initial value with a new variable name. Then, inside a loop, add an if - then block and an operator block to update the timer value every one second, which is essential for simple games. This Scratch timer tutorial ensures your timer behaves as expected in any project.
You can reset timer block at any point or use timer stop to pause your functional timer. After you build the timer script, you can adjust its specified amount or desired amount of seconds to suit your project requirements.
A countdown timer can add pace to interactive projects and teach computational thinking. For example, you might start the timer script when a level begins, then timer works until the game ends. You can even tie sound effect cues or complex animations to the timer to add sound effects, adding an extra layer of challenge. Later, run a quick timer test to confirm your all the scripts update correctly and display the correct time throughout your scratch environment.
What is a Timer in Scratch?
Scratch has a timer in its Sensing palette. It starts counting when you click the green flag. This timer in Scratch works like a stopwatch. It measures time in seconds and fractions. Teachers often use it as a quick timer to check how fast a sprite finishes a task or how quickly a player answers a quiz question. If you're wondering how to make a timer in Scratch, this built-in feature is the simplest starting point.
The built-in timer runs without manual intervention, making it perfect for simple projects. It gives learners practical experience with coding and computational thinking in Scratch.
You can create a custom timer variable for better control. Set the timer to any starting value you want. This way, you can make a real countdown timer with a clear time limit. This approach lets you create a timer that decides when the timer stops and broadcast events like “Game Over” in your Scratch game.
Timer in Scratch focuses on loops, variables, and event-driven scripts. Timers in Scratch help students create fun and interactive way animations. They also turn these into exciting high-score challenges. This way, students learn real programming skills.
Step by Step Tutorial for Timer in Scratch
Let’s build a fully working custom timer from scratch. This tutorial will guide students through each step using Scratch blocks and code .
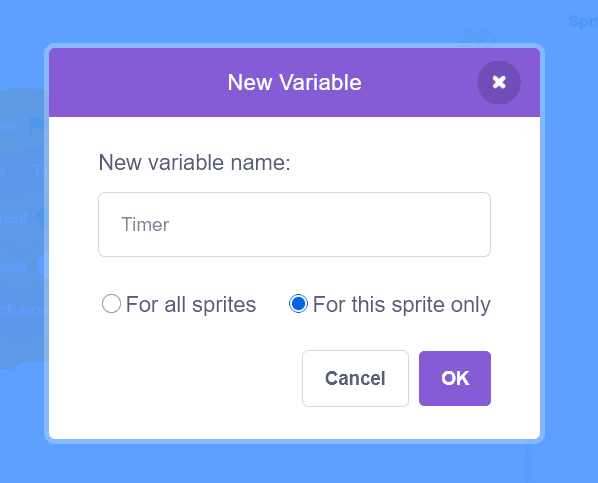
Step 1: Create a New Variable Called
Create a variable and name it something like “Timer” or “Time Passed”. This variable will store and display your time value.
Go to “Variables” → “Make a Variable”
Choose “For all sprites” radio button before clicking "OK"
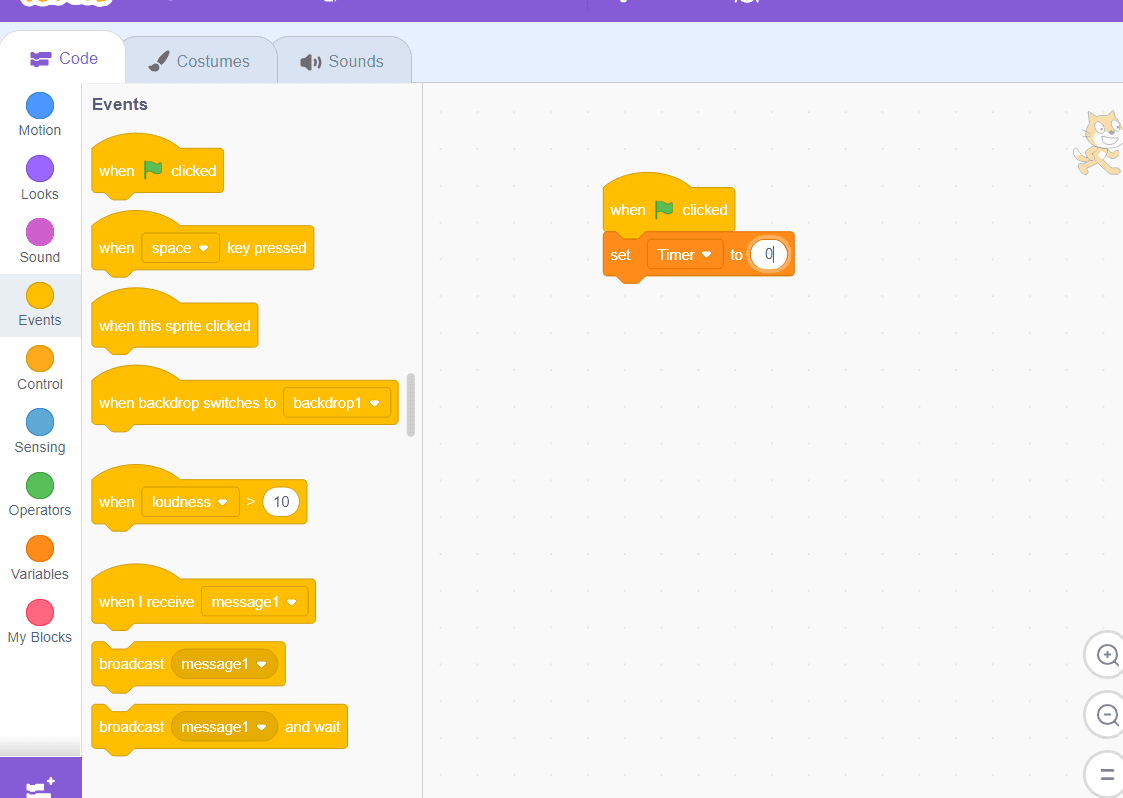
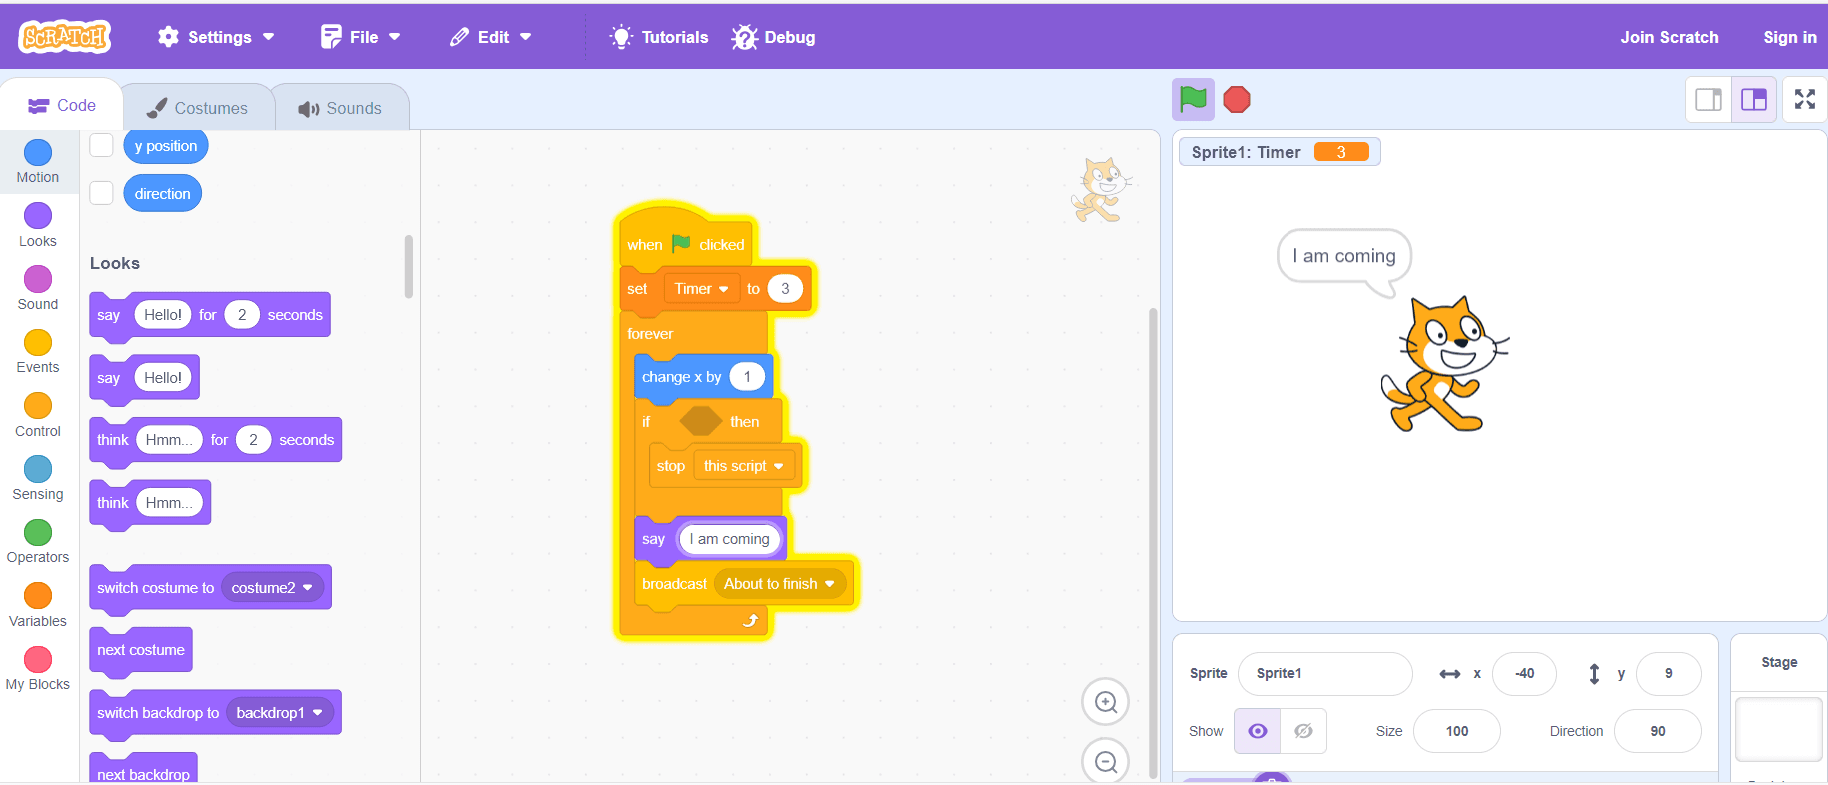
Step 2: Set the Timer to 0 at the Start of the Game
You want the timer to start fresh every time the project starts, especially after a certain amount of time.
Use the “When green flag clicked” block
Add “Set [Timer] to 0” right after it
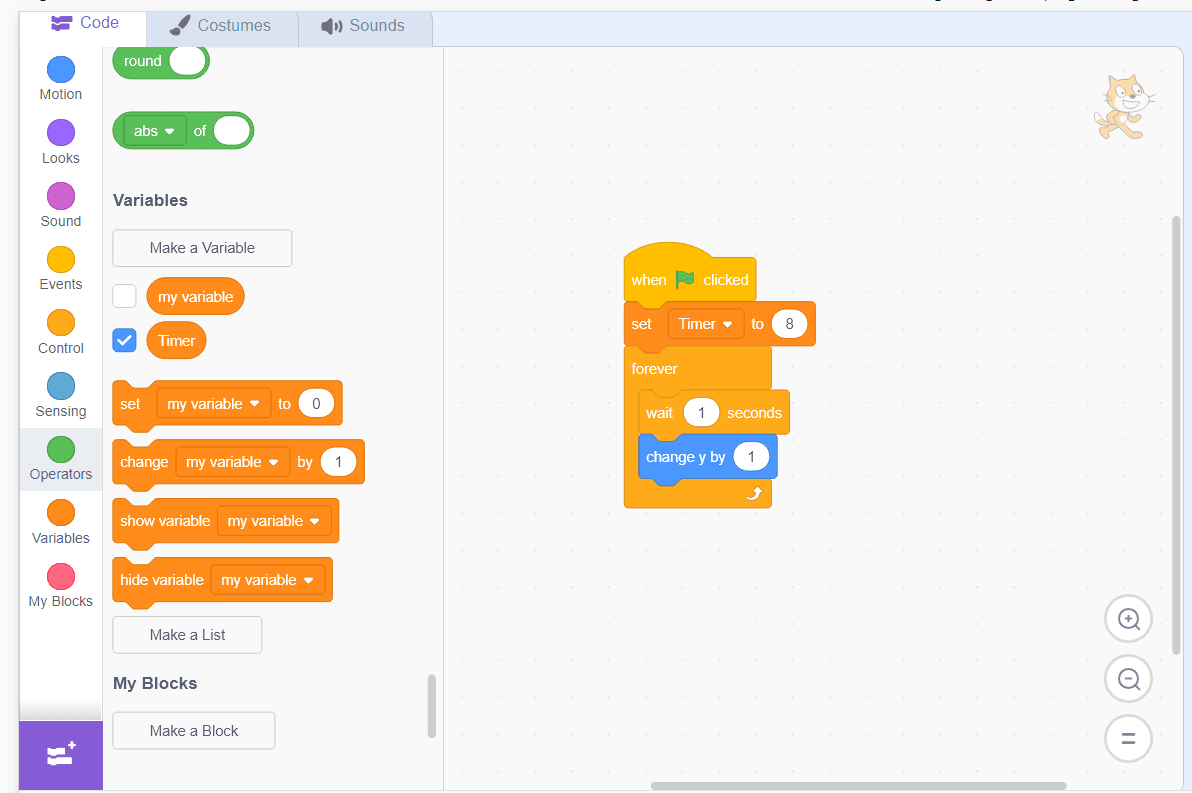
Step 3: Make the Timer Count Up Every Second
Now create a loop that adds 1 to the timer every second.
Use “Forever” and “Wait 1 second” blocks
Inside the loop, add “Change [Timer] by 1”
Step 4: Display the Timer on the Screen
Make sure the timer variable is visible so users can see it counting.
Check the box next to the Timer variable
You can also use the “Say [Timer]” block for sprite-based display
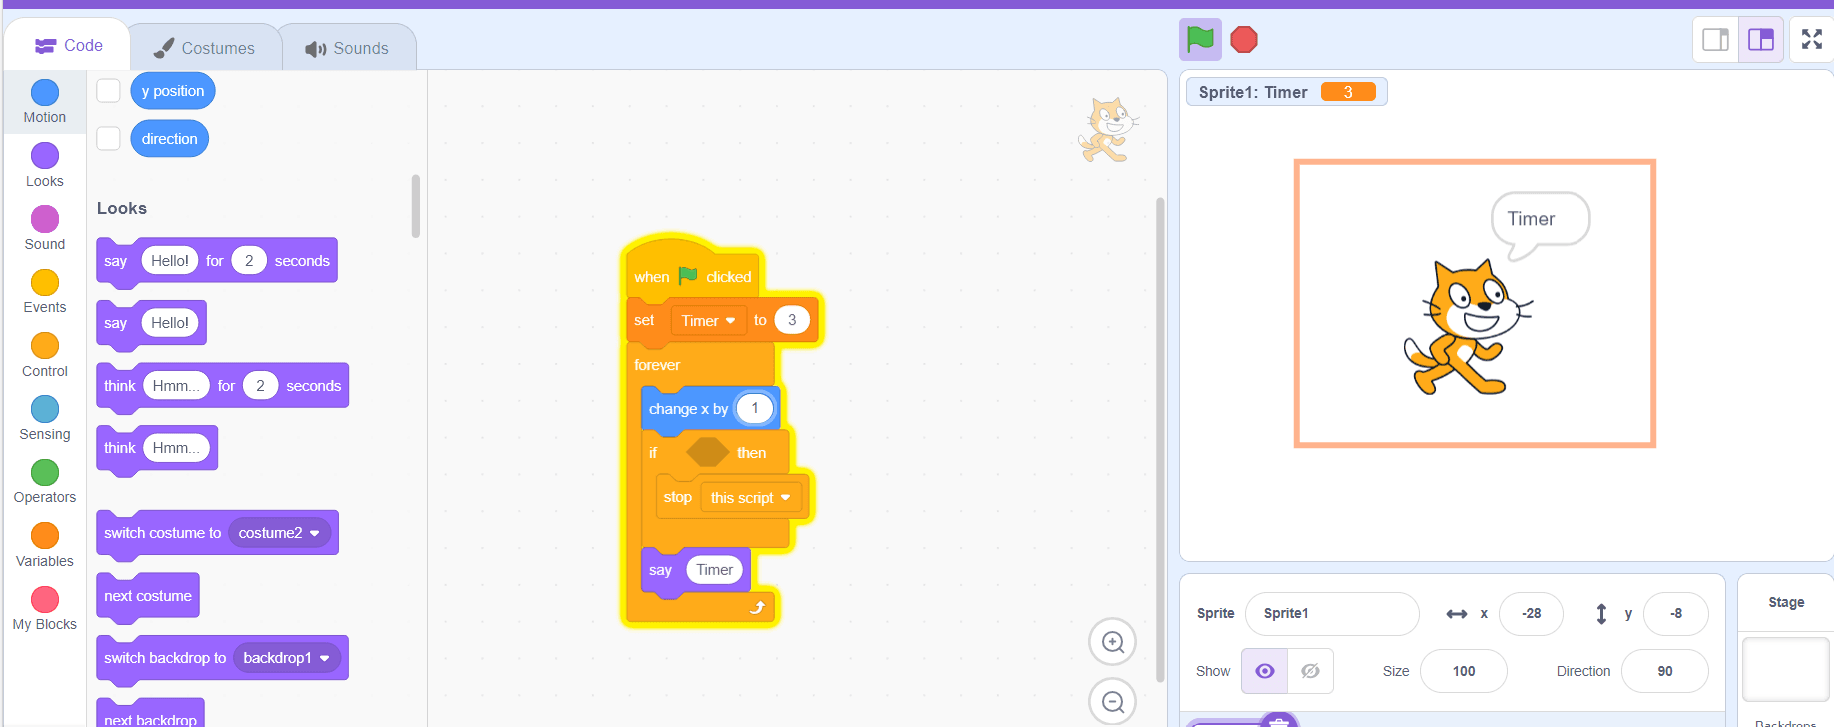
Step 5: Stop the Timer
You may want to stop the timer variable when the game ends or a goal is achieved.
Use a condition like “If [game over] then stop [this script]”
You can also use broadcast messages to control timing
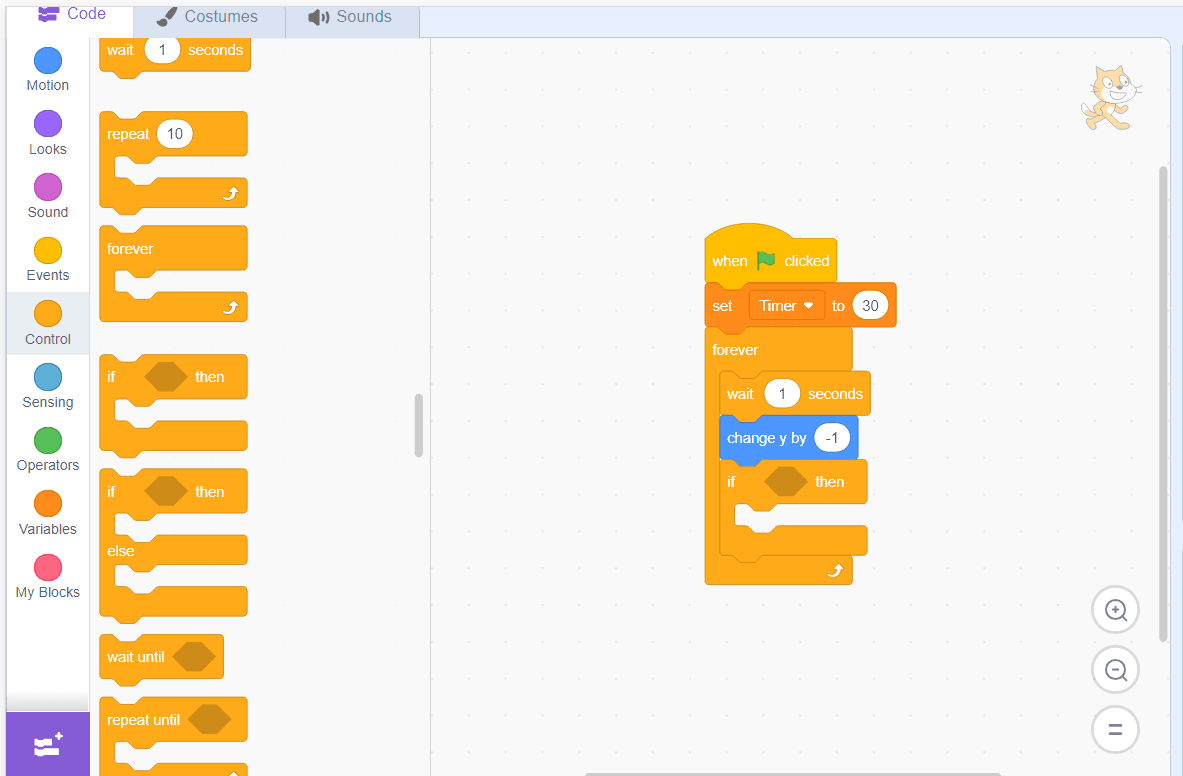
Step 6: Bonus – Countdown Timer
Want to make it more exciting? Flip the logic to count down.
Set timer to a value like 30
Use “Change [Timer] by -1” inside the loop
Add an “If [Timer] = 0 then end game” condition
For game ideas that put a countdown timer to good use, our list of easy Scratch games to make is a great starting point.
How to Make a Timer Have a Limit in Scratch
To create a Timer with a limit, use a custom timer variable. Control the starting value and the stopping condition for the timer. First, when you click the green flag, set the timer to your specified amount as desired time limit (e.g. 60 seconds) in your Scratch project. Then use a loop with an if then block that checks the variable each second and stops when the timer reaches zero.
By testing "if timer = 0" (or "repeat until timer < 1"), you ensure that the timer in Scratch never exceeds your limit. Change the starting value. For a quick check, set it to 30, while also considering when the time runs . For longer challenges, use 120. This way, the same code will fit any Scratch game.
Once timer runs out, trigger events to end the game or reset the game. It may show "Time’s up!", stop sprites, or display a results screen. This block-based method uses conditional logic and variables.
It makes games fun and interactive. Plus, it teaches core coding concepts. This simple setup gives your Scratch project a dependable countdown timer. It also ensures clear game endings, all without needing complex code.
Conclusion
Timers are simple but powerful tools in Scratch. They teach computational thinking and improve game mechanics. They help young coders manage variables and understand loop logic. This Scratch timer tutorial helps students quickly learn how to make a timer in Scratch and apply it across creative projects.
Set the timer when you click the green flag. Then, use if-then blocks to track the remaining time. In this way, you can create countdowns for any Scratch game. These coding concepts not only make interactive projects more engaging but also teach essential problem-solving skills. Reset the timer between rounds and adjust the scripts slightly for better performance. Adjust the starting value for each challenge. This works for simple games with sound effects or tough challenges with strict time limits.
Once your timer is set up, our guide on how to make a game on Scratch walks you through building the full game around it.
Timer in Scratch - FAQs
What is the purpose of using a timer in Scratch projects?
A timer in Scratch lets you track game duration and gives a clear time limit on challenges. Adding a timer variable makes animations more engaging. Players can see the time left on the screen.
A timer adds structure and excitement to your quiz or race game. It helps test speed and scores based on elapsed time. This core feature helps students manage variables and react to events. It makes every Scratch project more dynamic and fun.
Can I set a time limit for a game using a Scratch timer?
You can make a countdown timer. First, create a new variable, like “Time Left”. Then, set the timer to your starting value. Then use a simple if–then block or loop to check when timer reaches zero and stop the game or show a “Time is up!” message.
This method lets you control the time limit in your Scratch game. It’s much better than what the built-in timer can do. It’s a fundamental trick in any Scratch timer tutorial for students to learn how much time is needed for each challenge.
How is a timer in Scratch different from the built-in Scratch timer?
Scratch has a built-in timer that counts up in seconds when you click the green flag. You cannot pause or change it, except to reset it completely. A custom timer uses your own script and variable name. This lets you set the timer to any initial value and count down with a loop.
Custom timers work in all your scripts. You can trigger game-ending events or sound effects when time runs out. This method highlights important coding concepts, such as loops and conditionals, with a visual programming language.
Do I need coding experience to follow a step-by-step tutorial for a timer in Scratch?
No. Scratch is designed for students and beginners. Its easy to create a timer using drag-and-drop blocks, not code. Just pick blocks from the Scratch library, create a custom timer variable name.
Even young learners can build a functional timer by following clear, numbered steps without prior coding skills.
Is the timer feature useful in Scratch for students learning logic?
Absolutely. A timer helps students learn computational thinking. It combines loops, variables and conditional logic into one project. When they make a timer, they see how a timer value changes each second, and they learn to use if–then blocks to trigger events at the right moment.
These small coding concepts form the foundation of problem‑solving, helping learners understand how instructions flow in any program.
How can I test if my Scratch timer is working correctly?
Begin with low test values. For example, set the timer to 5 seconds. This lets you see the display count down quickly. Click the green flag to start, and observe how the time remaining updates each one second in your Scratch environment.
If the timer stops at zero and triggers your “game ends” event, it works as intended. Adjust the loop or reset timer block until it runs smoothly, then increase to your desired amount for the final project.
Comments
Your comment has been submitted