
A clicker game in Scratch is the smallest project that contains a whole economy: something you click to earn, a shop that spends what you earned, an upgrade that earns for you while you watch, and prices that climb so the game never runs out of goals. It looks simple and it is, but every one of those parts teaches a real programming idea, and three of them hide bugs that most tutorials never mention.
This guide builds an original game called Gem Miner. The player clicks a crystal to mine gems, buys a better pickaxe to earn more per click, and buys mining robots that dig one gem a second each. Every step ends with what should happen when your child clicks the green flag, so they can check their own work before moving on. For parents: by the end, your child will have used variables, if-else decisions, a loop that runs on a clock, and multiplication by a decimal, in a game they will actually want to keep playing.
Key Takeaways
- The whole game runs on five variables: gems, gems per click, pickaxe cost, robots and robot cost.
- Use set size to, not change size by, for the click squash. Scratch restarts a when this sprite clicked script on every click, and in our test the change-size version shrank the crystal away after twenty fast clicks.
- Check purchases with not <gems < cost>, not gems > cost. Scratch has no greater-than-or-equal block, and the > version refuses a player who has exactly enough.
- Pay first, then raise the price. Reverse the order and the player is charged the new, higher price.
- round (cost * 1.15) gives prices that rise about 15 percent per purchase and stay whole numbers.
What does the finished clicker game in Scratch look like?
One crystal in the middle of the stage, two shop buttons on the right, and the gem count in large numbers at the top. That is the entire screen, and it is enough.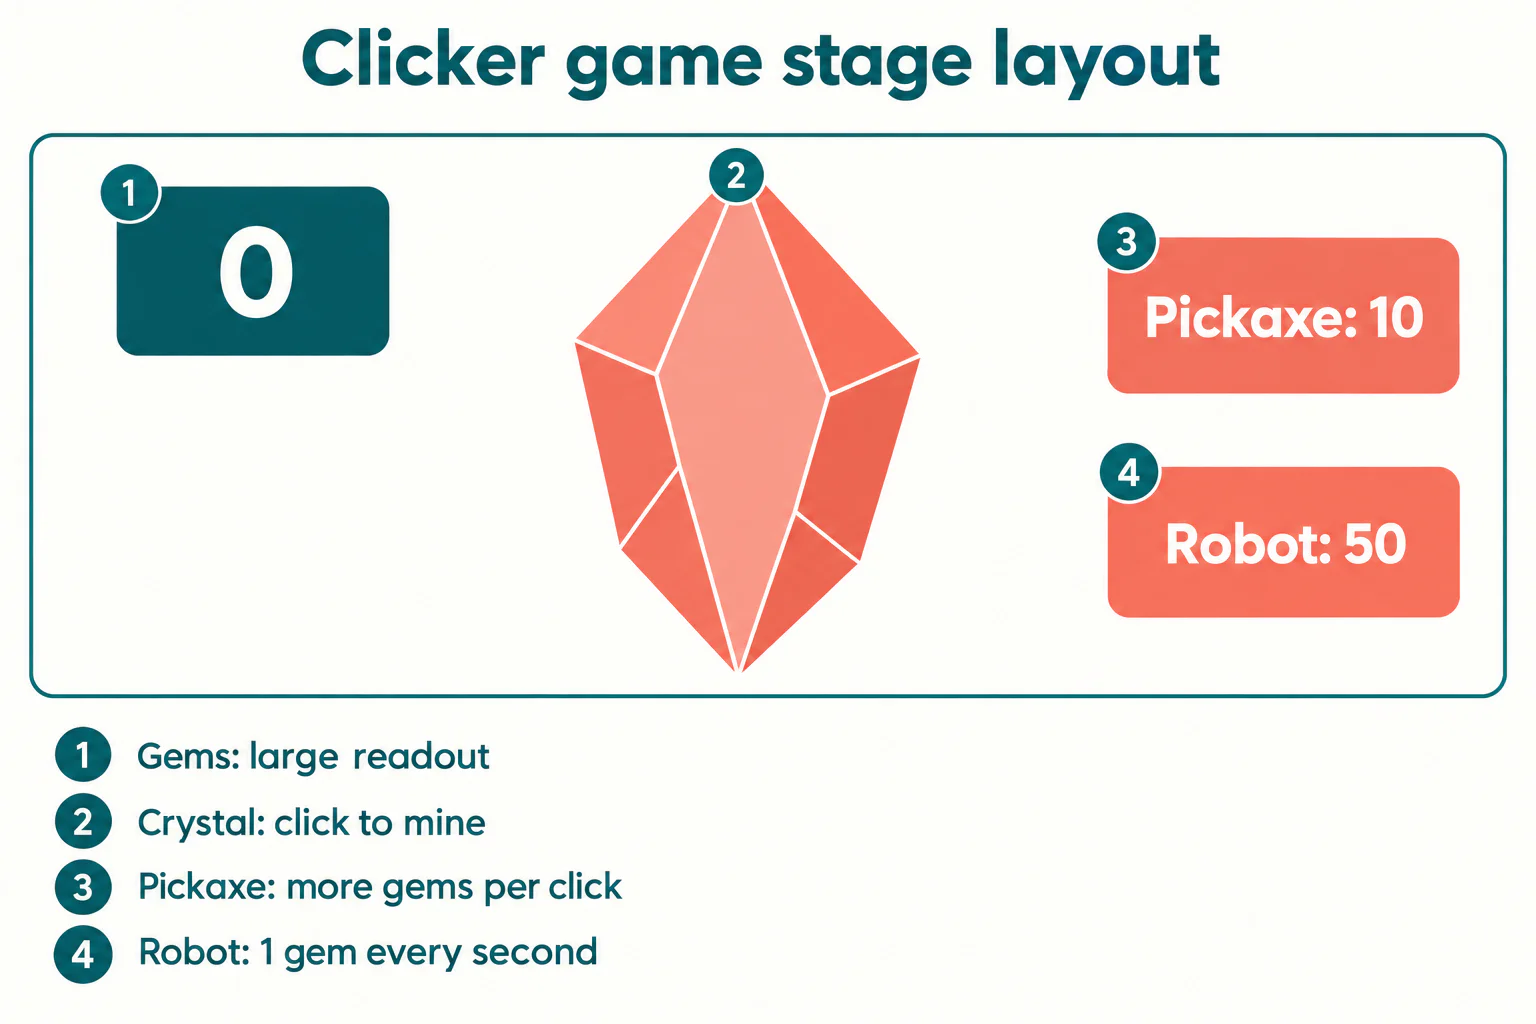
Before any blocks, here are the five variables the game needs. Make every one with For all sprites selected, because the crystal, both buttons and the stage all need to read and change the same numbers. If you have not met that choice before, our guide to making a score counter in Scratch explains exactly why it matters, and what goes wrong in clone games when it is set the other way.
| Variable | Starts at | What it holds |
|---|---|---|
| gems | 0 | The player's money |
| gems per click | 1 | How many gems one click earns |
| pickaxe cost | 10 | Price of the next pickaxe upgrade |
| robots | 0 | How many mining robots the player owns |
| robot cost | 50 | Price of the next robot |
Steps 1 to 3: sprites, variables and a clean start
- Add the sprites. Delete the cat. Click Choose a Sprite and add Crystal, which is in Scratch's own library with two costumes. Then add Button2 and Button3 for the shop. Rename them Crystal, Pickaxe Shop and Robot Shop, and drag the two buttons to the right side of the stage. Click the green flag: nothing happens yet, and that is correct.
- Make the five variables. In the Variables category, click Make a Variable five times, using the names in the table above, each one For all sprites. Untick the checkboxes for everything except gems, then right-click the gems monitor on the stage and choose large readout. Click the green flag: still nothing, but you should see a big 0 at the top of the stage.
- Reset everything on the green flag. Click the stage (bottom right of the editor) and build this script:
when green flag clickedset [gems] to (0)set [gems per click] to (1)set [pickaxe cost] to (10)set [robots] to (0)set [robot cost] to (50)
Step 4: make the crystal earn gems
Click the Crystal sprite and give it one script:
when this sprite clickedchange [gems] by (gems per click)
Drag the round (gems per click) reporter from the Variables palette into the number slot. Do not type a 1 there. Typing a 1 works today and silently breaks the pickaxe upgrade in step 6, which is the kind of bug that makes a child think the shop code is wrong when the crystal code is.
Click the green flag, then click the crystal five times: the readout should go 1, 2, 3, 4, 5. Click the green flag again and it should drop back to 0.
Step 5: the squash effect, and the version that breaks
A click needs to feel like something. The usual trick is a quick squash: the crystal shrinks a little and springs back. Almost every first attempt looks like this:
change size by (-10)wait (0.1) secondschange size by (10)
It works perfectly when you click slowly. Click fast, the way anyone plays a clicker game, and the crystal gets smaller and smaller until it nearly disappears.
The cause is a rule hardly any tutorial mentions. In the Scratch 3.0 source code, the when this sprite clicked hat is set to restart its script if it is clicked while that script is still running. So a second click that lands during the 0.1-second wait throws away the rest of the first run, including the change size by (10) that was about to put the size back. The first click took 10 off and never returned it. The second click takes another 10.
We tested this in the Scratch 3.0 engine itself. Twenty clicks about ten a second, using the change-size version, drove the size value from 100 to below zero; on a real stage Scratch stops a sprite at a speck a few pixels across, so the crystal effectively vanishes. At about seven clicks a second it recovered every time, and around eight a second it lost some size and kept the rest. A child mashing the mouse goes well past eight.
The fix is to describe the target size instead of the change:
when this sprite clickedchange [gems] by (gems per click)set size to (90) %wait (0.1) secondsset size to (100) %
Notice the order too. The gems line goes first, above the wait, so an interrupted click still pays. Put it below the wait and fast clicks earn nothing, because the restart cuts the script off before it gets there. In our test, with the gems line at the top, twenty fast clicks earned exactly twenty gems.
Click the green flag, then click the crystal as fast as you can for five seconds: the crystal should pulse and always return to its normal size, and the gems should keep pace with your clicks.
If your child got stuck at the squash bug and you are not sure how to explain it, that is exactly the moment a live teacher helps. A free trial class with a Codeyoung teacher shows you where your child is and what they are ready for next, before you commit to anything.
Book a Free Trial →Step 6: build the upgrade shop
The pickaxe raises gems per click by one. Click the Pickaxe Shop sprite and build:
when this sprite clickedif <not <(gems) < (pickaxe cost)>> thenchange [gems] by ((0) - (pickaxe cost))change [gems per click] by (1)set [pickaxe cost] to (round ((pickaxe cost) * (1.15)))
elseswitch costume to (button2-b)wait (0.2) secondsswitch costume to (button2-a)
Two details in that script are deliberate, and both fix a real bug.
Why not <gems < cost> instead of gems > cost
The natural way to write "can I afford it" is <(gems) > (pickaxe cost)>. Try it with exactly 10 gems and a price of 10: nothing happens, because 10 is not greater than 10. The player has precisely enough and the shop refuses them. Children usually decide the shop is broken and start changing things that are fine.
Scratch's Operators category has >, < and =, and no greater-than-or-equal block. The cleanest way to say "at least" is to wrap the opposite question in not: "gems is not less than the cost" is true at 10 and above. It is also a good small logic lesson, since it is the first time many children meet a condition that is easier to state backwards.
Why pay before raising the price
The three lines inside the if run in order. If set [pickaxe cost] came first, the next line would charge the new price, so a player buying a 10-gem pickaxe would lose 12. Pay, deliver, then reprice. The (0) - (pickaxe cost) is there because Scratch has no "take away" block for variables; changing by a negative number does the same job.
The else branch flashes the button to its second costume when the player cannot afford it. It uses switch costume to rather than next costume for the same reason as the squash fix: a fast double-click restarts the script, and absolute instructions survive a restart where relative ones do not.
Click the green flag, mine 10 gems, then click the pickaxe: gems drop to 0, and each crystal click now earns 2. Click the pickaxe again with fewer than 12 gems and the button should flash.
Step 7: make prices rise with every purchase
Without price scaling, the game has a single right answer: buy pickaxes forever. Rising prices are what make the choice between pickaxe and robot interesting.
The round ((pickaxe cost) * (1.15)) line in step 6 does this. Multiplying by 1.15 makes each price about 15 percent higher than the one before, and round keeps it a whole number. Here is what that produces:
| Purchase | 1st | 2nd | 3rd | 4th | 5th | 6th |
|---|---|---|---|---|---|---|
| Pickaxe cost | 10 | 12 | 14 | 16 | 18 | 21 |
| Robot cost | 50 | 57 | 66 | 76 | 87 | 100 |

Two things in that table are worth pointing out to an older child. First, leave out round and the pickaxe costs 13.225 after two purchases and 15.208749999999998 after three, which is not a price anyone can read. Second, the robot goes from 50 to 57, not 58, even though 50 times 1.15 is 57.5 and Scratch rounds halves up. Computers store 1.15 as a binary number very slightly smaller than 1.15, so the answer comes out as 57.49999999999999 and rounds down. It is a real, harmless example of why programmers never trust a decimal to be exact.
Click the green flag and buy three pickaxes: the prices you pay should be 10, then 12, then 14.
Step 8: add an auto-mining robot
The robot is what turns a clicking game into a clicker game: gems arrive while the player does nothing. Click the Robot Shop sprite. Its buy script is the step 6 script with the names changed: check not <(gems) < (robot cost)>, pay (0) - (robot cost), change [robots] by (1), then set [robot cost] to (round ((robot cost) * (1.15))). Use button3-b and button3-a for the flash.
Then give the Robot Shop a second, separate script:
when green flag clickedforeverwait (1) secondschange [gems] by (robots)
It must hang from the green flag, not from when this sprite clicked. Put the forever loop in the click script and every click on the shop restarts it, so a player who buys robots quickly keeps resetting their own income.
Plenty of forum advice says a wait (1) seconds loop runs a whole frame slow every time round, which would lose about one point in thirty. We could not reproduce that in Scratch 3.0. We ran this exact loop in the Scratch 3.0 engine for five minutes, and one robot earned 297 gems in 300 seconds: about one percent slow, not three. For a clicker game that is invisible. If your child later builds something where seconds must be exact, such as a countdown, the built-in timer reporter is the precise tool, and our step-by-step Scratch timer tutorial shows how to use it.
Click the green flag, mine 50 gems and buy a robot: the gems should now rise by 1 every second without any clicking. Buy a second and they rise by 2.
Step 9: show the prices on the buttons
The player needs to see what things cost. Add this to the Pickaxe Shop:
when green flag clickedforeversay (join [Pickaxe: ] (pickaxe cost))
Do the same on the Robot Shop with (join [Robot: ] (robot cost)). Leave a space after the colon inside the first slot of join, or the number sticks to the word. The speech bubble updates the instant a price changes.
If your child wants to show income as well, tick the checkbox beside robots so it appears on the stage, and right-click it to choose how it looks. A normal readout shows the name and value, a large readout shows only the value, and a slider is for numbers the player sets, which these are not.
Click the green flag: the buttons should read "Pickaxe: 10" and "Robot: 50", and change the moment you buy.
Testing checklist: four bugs and their fixes
When something goes wrong, it is almost always one of these. Read the symptom column first.
| Symptom | Cause | Fix |
|---|---|---|
| Crystal shrinks away with fast clicks | change size by plus script restart | set size to (90) % and set size to (100) % |
| Cannot buy with exactly enough gems | gems > cost | not <(gems) < (cost)> |
| Upgrade costs more than the label said | Price raised before paying | Pay, deliver, then reprice |
| Pickaxe bought but clicks still earn 1 | Typed 1 in the crystal's change block | Use the (gems per click) reporter |
The approach that finds these fastest is to predict before testing: say out loud what the number should be after the next click, then click. A wrong prediction points straight at the line to check. Our guide to teaching kids debugging goes further with that habit.
Where to take Gem Miner next
Once the base game works, each addition is a small project of its own:
- A record that survives a reload. Gems reset when the game reopens. Keeping a best total between players needs a cloud variable, and our guide to saving a high score in Scratch covers the rules, including why brand-new accounts cannot use one yet.
- A third upgrade, such as a drill that adds 5 per second at a starting price of 300. It is the robot script again with different numbers, which is a good test of whether your child understood it or copied it.
- A goal. Clicker games can run forever, but children often enjoy a finish line:
wait until <(gems) > (999)>followed by a winning backdrop.
For a broader build with movement, collisions and levels, how to make a game on Scratch is the natural next tutorial.
Conclusion
A clicker game in Scratch is five variables, a crystal that earns, two shop buttons that spend, and one forever loop that pays the robots. The parts worth slowing down for are the three that look right and are not: the squash that shrinks under fast clicking because the click script restarts, the > check that refuses exact money, and the purchase that charges the new price because the lines are in the wrong order. A child who can explain why each fix works has learned more than one who simply copied a working game.
If your child enjoyed this, Codeyoung's Scratch coding classes build projects like this one with a teacher alongside, so the bugs become lessons instead of reasons to stop.
Codeyoung runs 1:1 live online classes for children aged 6 to 17, with a teacher who adapts the pace to your child rather than a fixed syllabus. The first class is free, so you can see how they respond before deciding.
Book a Free TrialSources checked 12 November 2026: block labels from the Scratch Wiki Blocks list, Wait () Seconds and Variable pages; the restart behaviour of when this sprite clicked from the Scratch Foundation's scratch-vm source; the Crystal, Button2 and Button3 sprites from the scratch-gui sprite library file. The rapid-click and five-minute loop measurements are our own, run on the scratch-vm engine; a browser may differ slightly in timing.